
Kubernetes Security Best Practices Part 2: Network Policies
A blog post series to share best practices for optimal Kubernetes security.
Welcome back to this blog post series on Kubernetes Security, where I share best practices for optimal security on Kubernetes. In Part 1 of the series, we looked in detail at Role-Based Access Control (RBAC). In today’s blog post, we will focus on Kubernetes NetworkPolicies.
What is a NetworkPolicy, and why do I need it?
By default, all pods in a Kubernetes cluster can communicate with each other, regardless of the node they exist on or the namespace they're in. This is very convenient from a usability perspective but far from great for security. Because if an attacker could take over a pod without network restrictions, he could connect to any other pod in the same cluster, even to a pod that, e.g. has access to sensitive information.
This is where NetworkPolicies come into the picture. With NetworkPolicies, you can restrict the network flow between pods in a Kubernetes cluster on the IP address or port level, which is precisely what we need.
Now let’s discuss some points that are important to know about NetworkPolicies.
A CNI that supports NetworkPolicies is needed
To use NetworkPolicies, you need a Container Network Interface (CNI) that supports Kubernetes NetworkPolicies. Well, know CNIs are, e.g., Calico or Cilium.
If you use a CNI that does not support NetworkPolicies, you can define them anyway, but they won't have any effect.
NetworkPolicies are namespaced
The next thing to understand is that a NetworkPolicy is a namespaced resource in Kubernetes.
This means that you have to create your NetworkPolicy inside the namespace, where the pod that you want to restrict the network traffic for lives. If you create a NetworkPolicy without defining a namespace, the NetworkPolicy is created in the “default” namespace.
NetworkPolicies are additive
Please note that NetworkPolicies are additive. So, if you create a NetworkPolicy that allows pod1 to talk to pod2 and another that allows pod1 to talk to pod3, then the two policies are combined. Pod1 can talk to both pod2 and pod3.
NetworkPolicies have to be defined on both sides
The last thing to consider is that to allow a connection between pods, the connection has to be allowed on both sides.
For example, if pod1 should be allowed to connect to pod2, an egress policy has to be defined for pod1, and for this connection to work, an ingress policy has to be defined for pod2.
Additional information about NetworkPolicies can be found on the official Kubernetes documentation:
Structure of NetworkPolicy
Now that we know why we need NetworkPolicies and how they work let’s see how a NetworkPolicy is created.
# 1 — podSelector
The first part in the “spec” section is the podSelector, which defines the pods the NetworkPolicy applies to.
If matchLabels is specified, the NetworkPolicy is valid for all pods in the defined namespace that either
- have a specified label set (like in the example above) or
- that have the specified name, for example like this:
It is also possible to define an empty podSelector, which selects all pods in the namespace the NetworkPolicy exists:
# 2 — policyTypes
The second part in the “spec” section is the policyTypes, which defines the type of the NetworkPolicy. The following settings are possible:
- If both “-Ingress” and “-Egress” are defined like in the example above, the policy applies to incoming and outgoing traffic.
- If only “-Ingress” is specified, the policy only applies to incoming traffic.
- If only “-Egress” is specified, the policy only applies to outgoing traffic.
# 3 and # 4 — ingress and egress policies
If the policyType “-Ingress” was specified, the allowed incoming connections have to be defined in the ingress section. There are two sections: the “from” and the “ports” section.
In the “from” section, the following blocks can be specified (either alone or together):
ipBlock:
The block of IP addresses from where connections to the selected pod(s) are allowed. In an ipBlock, IP addresses can be excluded.
namespaceSelector:
The namespace, from where ingoing connections are allowed. If matchLables is specified, the ingress is allowed from namespaces that either
- have a specific label set or
- that have a specific name
podSelector:
The pods, from where ingoing connections are allowed. If matchLabels is specified, the ingress is allowed from pods that either
- have a specific label set, or
- that have a specific name
The “ports” section specifies the port to connect to.
If the policyType “-Egress” was specified, the allowed outgoing connections have to be defined in the egress section. There are two sections: the “to” and the “ports” section.
Regarding every other aspect of the egress section, the same is true for the ingress section.
To illustrate more in-depth how ingress and egress policies can be defined, look at the two examples below (I have used an ingress policy here, but the same applies to an egress policy):
If you know what the impact of using the “-” versus not using it is:
Well done, you can skip this section :)
So, here is the solution to the riddle:
In the first example, the ingress is allowed for pods in the namespace “frontend” or pods in the namespace the NetworkPolicy exists that have the label “app: web” specified.
In the second example, the ingress is allowed for pods that exist in the namespace “frontend” and have the label “app: web” specified.
The “-” in front of the selectors indicates that it is a separate “from” element.
To learn more about creating NetworkPolicies, the Cilium Editor can be used. Kubernetes NetworkPolicies or Cilium NetworkPolicies can be created quickly with the Cilium Editor.
Network Policy Editor for Kubernetes
NetworkPolicies best practices
We learned a lot about how to create a NetworkPolicy. In this section, let us discuss some best practices regarding NetworkPolicies. Let’s start!
Deny-all NetworkPolicy
The first best practice is to create a “deny-all” NetworkPolicy.
Because all network traffic is allowed by default, as we learned above, it is a good idea to start with denying all network traffic and then allowing only what is needed.
Maybe at this point, you ask yourself the following two questions (as I did when I started to learn about NetworkPolicies):
- How can this even work if NetworkPolicies are additive and I deny all?
- Do I always need a deny-all NetworkPoliciy?
Let’s address these two points separately:
- If you look at the deny-all NetworkPolicy, you can see that it is an allow-nothing policy. And adding an allow-nothing policy with a policy that allows something just means something is allowed :)
- Let’s address the second point if a deny-all policy is needed. A deny-all policy is usually not really needed, but it is best practice to implement one still.
Let’s dig a little deeper here. As soon as any NetworkPolicy is defined for ingress or egress, only the allowed connections are possible for the selected pods. That means, if you have any Ingress and an Egress NetworkPolicy for a pod defined, you won’t need a deny-all NetworkPolicy, because all that is not allowed is denied anyway.
But you should define one nevertheless, to be sure that if, e.g., you remove the Egress NetworkPolicy, the Egress is still denied.
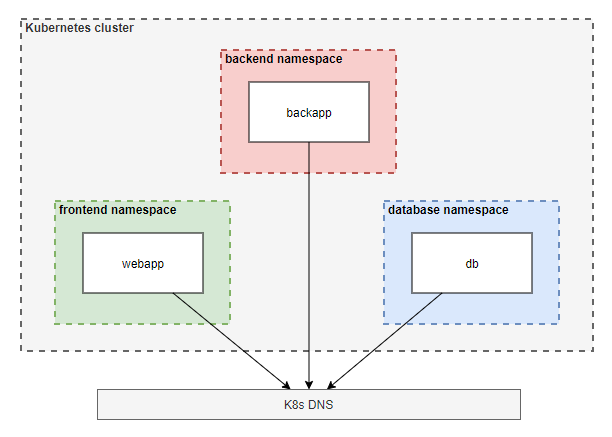
One additional thing needs to be addressed regarding the deny-all NetworkPolicy: You must allow access to the K8s DNS server. Otherwise, the DNS resolution would no longer be possible.
Block access to the Cloud Provider Metadata API
The next best practice is to block access to the cloud provider Metadata API.
Pods can access the cloud provider's Metadata API by default because they inherit the privileges of their Kubernetes node.
The cloud Metadata API can contain cloud credentials or provisioning data like Kubelet credentials, which can be used to escalate within the Kubernetes cluster or to other cloud services.
The access should be blocked if there is no valid use case for a pod to access the Metadata API. This can be done with a NetworkPolicy.
If no access to the outside is needed …
block all outgoing connections altogether. In that case, you don't need to block the access to the Metadata API extra because it will be co-blocked.
If access to the outside is needed …
just block the access to the cloud provider Metadata API by excluding the Metadata APIs IP address from the allowed IP addresses (see example).
The metadata IP address for all cloud providers is 169.254.169.254:
Names are important
You probably know this recommendation from the last blog post about RBAC, but this is also true for NetworkPolicies. You save yourself a lot of trouble if you carefully select the names for your NetworkPolicies.
So, think up a naming system that gives you information about what your NetworkPolicy implements just by looking at the name of the policy.
Example
Now that we learned so much about NetworkPolicies let’s illustrate how they can be used with the following example.
For simplicity in this example, the Nginx image is used for all pods.
Step 1: Create the resources for the NetworkPolicy example
- Create the namespaces
- Create the pods
- Create the services for the pods
- Verify that all created pods and services exist
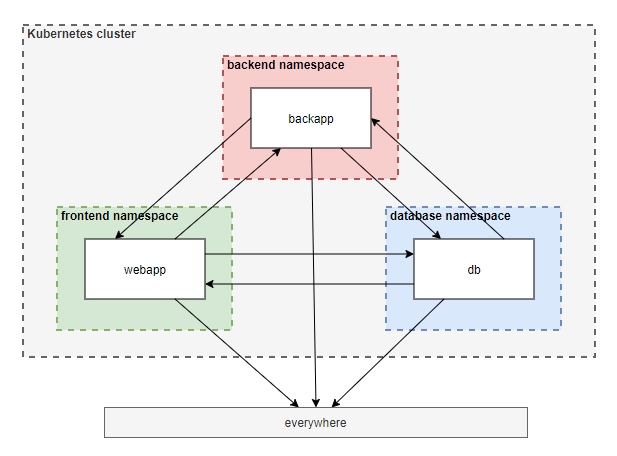
Step 2: Verify that the three pods can talk to each other
- Wait until the pods are running
- Instead of curl to the service names, you can also curl to the service's IP address or the pod's IP address to test the connection.
Step 3: Create and apply a “deny-all” NetworkPolicy for all namespaces
- Use the example below and adjust the metadata.name and metadata.namespace for the other two namespaces.
Apply and check all NetworkPolicies:
Step 4: Verify that no connections between the pods are possible anymore
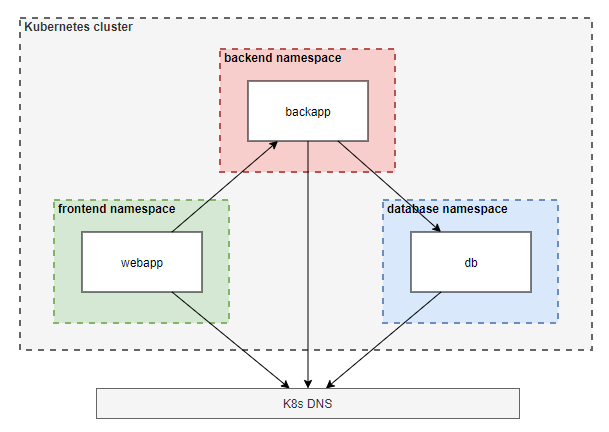
Step 5: Create and apply NetworkPolicies that allow the following traffic
From the webapp pod to the backapp pod:
- Create a NetworkPolicy that selects the webapp pod and allows outgoing traffic (egress) to the backapp pod:
- Create a second NetworkPolicy that selects the backapp pod and allows incoming traffic (ingress) from the webapp pod:
From the back-app pod to the database pod:
- Create a NetworkPolicy that selects the backapp pod and allows outgoing traffic (egress) to the DB pod:
- Create a second NetworkPolicy that selects the db pod and allows incoming traffic (ingress) from the backapp pod:
Apply and check all NetworkPolicies:
Step 6: Verify the connections are possible like they should be
Remark on this example
In this example, we defined very fine-grained NetworkPolicies. We selected the pod a NetworkPolicy applies to via its label and specified the ingress and the egress via the namespace and the label of the pod.
An easier way to start with NetworkPolicies is first to create policies on the namespace-level and then improve them over time.
E.g., the db-allow-ingress-from-backapp Networkpolicy from the example, defined on namespace-level, would look like this:
Summary
In this blog post, we covered the following topics:
- What a NetworkPolicy is and why we need it
- How NetworkPolicies are structured
- Best practices for defining NetworkPolicies, and
- An example of defining NetworkPolicies
And as a reminder at the end:
If you go through the following steps every time you start to create NetworkPolicies for your Kubernetes cluster, you should be fine:
- Step 1 — Ensure that the used Container Network Interface (CNI) supports Kubernetes NetworkPolicies
- Step 2 — Create a deny-all NetworkPolicy for every namespace
- Step 3 — Create NetworkPolicies for allowed connections
- Step 4 — Test the created NetworkPolicies
That’s it for this post. Thanks for reading, and have fun with securing your Kubernetes workloads!
Kubernetes Security Best Practices Part 2: Network Policies was originally published in Dynatrace Engineering on Medium, where people are continuing the conversation by highlighting and responding to this story.