
Kickstarting CI Best Practices in Autonomous Teams
How to increase engineering productivity by the example of creating and using a Jenkins executor image.

When developing a project, there are many things to consider. It’s not just about the code itself, but also about building, testing and packaging everything. Making this process easier is the main goal for the Engineering Productivity teams at Dynatrace.
This article gives an overview of the tools and services we use internally and how they all work together to achieve a great developer experience in our teams.
Jenkins
At Dynatrace we use Jenkins to build, test and deploy services and applications. To allow customizations and improve build times, we provision a Jenkins instance for each solution that needs one. This results, for example, in a dedicated Jenkins instance for a certain project and thus all teams working on this project may use this instance. Therefore, developers can configure their instance however they would like to. That includes setting administrators, access rights, plugins and many other settings.
All of those instances are provisioned via Configuration as Code (CasC) which means each Jenkins instance has a Git repository that contains its configuration. To configure an instance one simply needs to change the configuration in this repository and an automatic redeploy will apply all changes during the next night. But, as we are always trying to improve our workflows, this is a subject to be improved soon. Further, CasC helps to prevent configuration overrides if two people edit at the same time, introduces an audit log and makes it way easier to reproduce issues.
Kubernetes
Kubernetes is the tool of choice when it comes to container orchestration, which is the case in many projects. Let’s stay in the Jenkins domain to provide some examples: Jenkins spawns its workers on Kubernetes pods and all Jenkins CasC instances run on Kubernetes. Each Jenkins instance has at least one dedicated namespace it can use.
There are multiple Kubernetes clusters in place already, some of them On-Premises and some in the cloud. We are also currently working on a solution for cloud bursting if some workloads should exceed the limits of their current cluster, but that’s still in progress.
Furthermore, most internal services and applications run on Kubernetes.
Vault
Vault is used to store all kinds of secrets. This includes both simple Key/Value pairs and more sophisticated secret engines like an AWS Secrets Engine, which is capable of creating temporary AWS credentials for builds and other use cases.
One of the biggest advantages of Vault is its HTTP API to access secrets. Without this, one would have to store secrets once in a secret store and once in a place where they can be accessed by builds. This may become messy very quickly. With Vault, one just needs to store a secret in Vault and can then access it via the API. The Jenkins Vault Plugin utilizes this API to make the secret access even simpler. Vault also has a role-based access control mechanism in place which allows controlling access to secrets.
When provisioning a new Jenkins instance, we always ship a Vault engine with it. This means each Jenkins has its dedicated engine in Vault to store secrets.
Harbor
When it comes to container orchestration, one also needs a place to store images. That’s where Harbor comes into the game. Harbor is used as an internal image registry and also offers some handy features like a security scan and image retention.
Project Initializer
The Project Initializer is an internal tool that aims to make the bootstrapping of new projects as easy as possible. To achieve that, it allows users to generate new projects from templates. These projects are coupled to the template they were created from. Thus, if an update is pushed to a template, it gets propagated to all child projects. This makes it easy for template admins to keep all projects (e.g. all services of type X) up to date. Templates are based on Git repositories and can be created for all kinds of services or applications.
In addition to bootstrapping and updating projects, the Project Initializer also eases the process of generating new Bitbucket repositories. This means all users can request repository creations from templates. Before a repository gets created, the admins of the corresponding Bitbucket project have to approve the creation via a pull request. Once this pull request is merged, the repository will get created automatically.
EP Knowledge Base
The EP Knowledge Base is an internal documentation page that aims to enable developers to start projects and do most build- and CI-related maintenance on their own while avoiding problems that were already solved in Dynatrace.
Bringing It All Together — Create and Use a Jenkins Executor Image
The Problem
Let’s assume we have a repository that contains a simple Jenkins file that only has one stage with two commands to execute:
//Jenkinsfile
stages {
  stage('Print Java version') {
    steps {
      script {
        sh "java -version"
        sh "/opt/devtools/jdk-17+35/bin/java -version"
      }
    }
  }
}
This stage prints the default Java version and the version of the Java installation in the path /opt/devtools/jdk-17+35/bin/java. The build is using a custom Kubernetes agent. The configuration of this custom agent is shown below. As you can see in line 7, the image registry.lab.dynatrace.org/jci/ubunut20-amd64-base:latest is used for the Kubernetes agent.
// .ci/default.yaml -> Pod template
apiVersion: v1
kind: "Pod"
spec:
  containers:
    - name: "jnlp"
      image: "registry.lab.dynatrace.org/jci/ubuntu20-amd64-base:latest"
      imagePullPolicy: "Always"
      resources:
        requests:
          cpu: "1"
          memory: "512Mi"
        limit:
          cpu: "1"
          memory: "512Mi"
      args:
        - "jenkins-slave"

// Jenkinsfile
agent {
  kubernetes {
    label "default"
    idleMinutes '15'
    yamlFile '.ci/default.yaml'
    workspaceVolume emptyDirWorkspaceVolume(true)
  }
}
Executing this build fails because /opt/devtools/jdk-17+35/bin/java can’t be found:
[2022-03-21T13:33:56.874Z] + java -version
[2022-03-21T13:33:56.874Z] openjdk version "1.8.0_265"
[2022-03-21T13:33:56.874Z] OpenJDK Runtime Environment (AdoptOpenJDK)(build 1.8.0_265-b01)[2022-03-21T13:33:56.874Z] OpenJDK 64-Bit Server VM (AdoptOpenJDK)(build 25.265-b01, mixed mode)
[2022-03-21T13:33:57.161Z] + /opt/devtools/jdk-17+35/bin/java -version
[2022-03-21T13:33:57.161Z] /home/jenkins/agent/workspace/Demo_build-guild-spawn-pods_demo@tmp/durable-53233b2e/script.sh: 1: /opt/devtools/jdk-17+35/bin/java: not foundscript returned exit code 127
The Solution
To fix this problem we can create a new Jenkins executor image with Java 17 installed and use this image for the custom Kubernetes agent. The first step to achieving this is creating a new repository that contains the code for our Docker image. A Project Initializer template exists for this use case. When navigating to this template, it asks to enter values for a few placeholders.
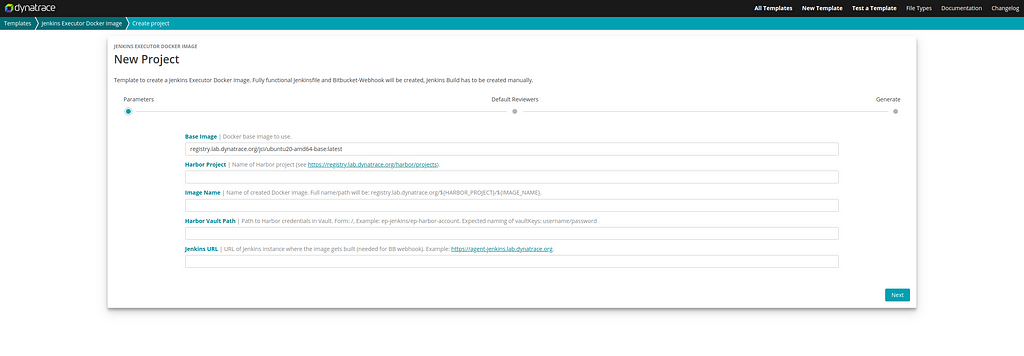
Let’s see how these values can be set.
- Base Image: Change the default value to registry.lab.dynatrace.org/jci/ubunut20-amd64-jdk17:latest as Java 17 should be installed.
- Harbor Project: That’s the Harbor project the image should be pushed to. I’ll use the ep project for this demo.
- Image Name: The name of the image to create. Let’s call our image blog-demo.
- Harbor Vault Path: That’s the part where it gets interesting. Read more about how to retrieve and store Harbor credentials below.
- Jenkins URL: The URL of the Jenkins that will build this image. During the demo, https://innovation-day-jenkins.apps.lab.dynatrace.org was used.
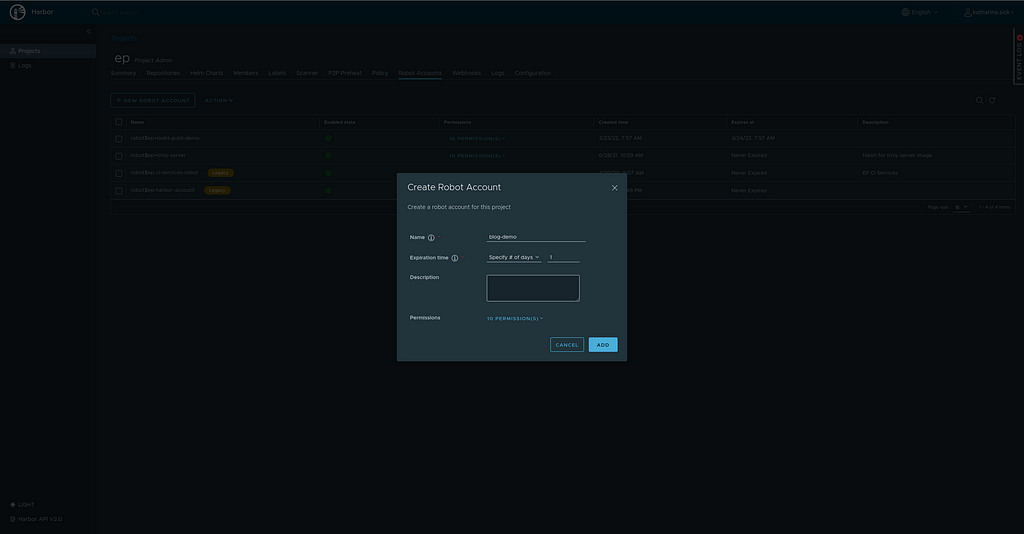
Retrieve and Store Harbor Credentials
Head over to the desired Harbor project to retrieve push and pull credentials. Select the menu tab “Robot Accounts” and click on “New Robot Account”. Next, you can enter a name, description and expiration time. Once all values are set, click “Add” to create the account.
Once you click “Add”, you’ll see the credentials for this account. Copy them and navigate to Vault. After authenticating with OIDC, you can select the engine you want to store your secret in. In the case of this demo, this is innovation-day-jenkins. Click on the desired engine and then select “Create secret”. Here you can choose a fitting name (demo name: blog-demo-harbor-credentials) and enter your credentials. Please set username and password as keys for the account credentials. When using different keys, you would have to adjust the Jenkinsfile to retrieve them.
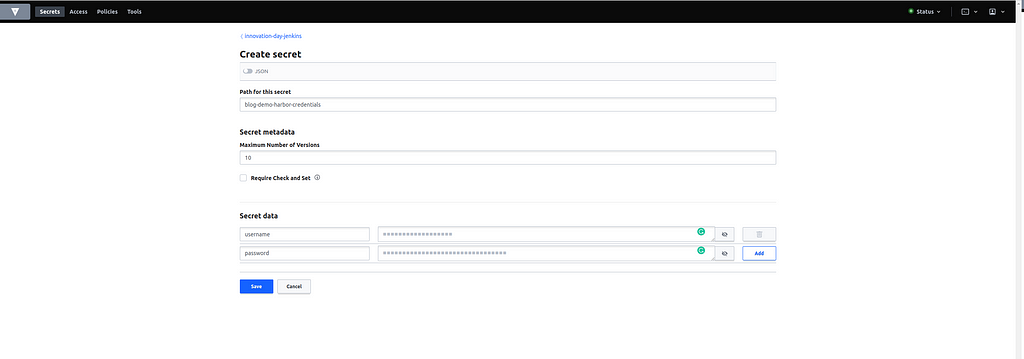
Now we are ready to go back to the Project Initializer and enter the path of the newly created secret for the placeholder “Harbor Vault Path”. In the demo case, this is innovation-day-jenkins/blog-demo-harbor-credentials.
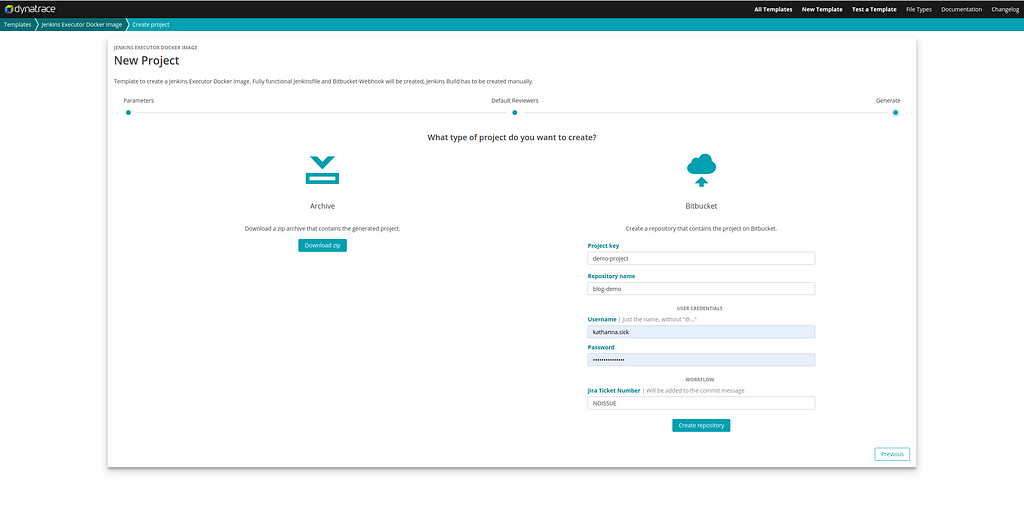
Generate the Repository
Now all placeholders are set, and we are ready to create the repository. Click next and enter some default reviewers if you want to. When clicking next again, you can either download your project or push it to a new Bitbucket repository. We’ll continue with the latter option. Therefore, enter your desired project key and repository name, your Bitbucket credentials and a ticket number. Then click “Create repository” and you’ll get a link to your newly created repository.
This template doesn’t use the approval workflow. Therefore you have to enter your Bitbucket credentials and your user will be used to generate the new repository. This means, you can only create repositories in Bitbucket projects, you are allowed to create repositories in.
Trigger a Build
To get everything ready, we need to build our executor image as the last step. For this demo, a Jenkins organization folder that scans a whole Bitbucket project was prepared in advance. This organization folder was configured with code to scan the project demo-project, which contains the demo repositories. To achieve this, the below file was added to the config folder of the innovation-day Jenkins repository.
// demo-org-folder.groovy
organizationFolder('Demo') {
description("Demo Organization folder")
displayName('CI Environments Intro')
// "Projects"
organizations {
bitbucket {
serverUrl("https://bitbucket.lab.dynatrace.org")
repoOwner("demo-project")
credentialsId("bitbucket-credentials")
traits {
bitbucketBranchDiscovery {
strategyId(1)
}
bitbucketPullRequestDiscovery {
strategyId(2)
}
headWildcardFilter {
includes('*')
excludes('')
}
}
}
}
// "Project Recognizers"
projectFactories {
workflowMultiBranchProjectFactory {
scriptPath 'Jenkinsfile'
}
}
// "Orphaned Item Strategy"
orphanedItemStrategy {
discardOldItems {
daysToKeep(365)
numToKeep(60)
}
}
// Scan Organization Folder
configure { node ->
node / triggers / 'com.cloudbees.hudson.plugins.folder.computed.PeriodicFolderTrigger' {
spec('H H(3-5) * * *')
interval(3600000) // milliseconds (1 hour)
}
}
}
As this organization folder was already created, we just need to give the innovation-day Jenkins read access to the newly created repository. Head to the “Repository settings” of your executor image and select “Repository permissions”. Enter the user git-inno-casc in the “User access” section and click “Add”. This step is necessary because the git-inno-casc user is used by the Jenkins instance to access Bitbucket repositories. Each Jenkins instance has its own Git user.

Now, we can navigate to the Jenkins organization folder and click “Scan Organization Folder Now” to let Jenkins discover our new repository and immediately trigger a build. This build builds, tags and pushes the executor image to Harbor. Once this build has succeeded we are done. The executor image is ready to be used in other builds.
Using the Executor Image
Now we are ready to fix the build I showed you during the problem description. To fix it, we can simply add a new pod template to the .ci directory. The only change we need to make is using the newly created executor image. Therefore I only touched line 7, all other lines are the same as in the .ci/default.yaml pod template.
// .ci/jdk17.yaml -> New pod template
apiVersion: v1
kind: "Pod"
spec:
  containers:
    - name: "jnlp"
      image: "registry.lab.dynatrace.org/ep/blog-demo:latest"
      imagePullPolicy: "Always"
      resources:
        requests:
          cpu: "1"
          memory: "512Mi"
        limit:
          cpu: "1"
          memory: "512Mi"
      args:
        - "jenkins-slave"
Next, we need to adjust the agent block in the Jenkinsfile. Below you can see that lines 4 and 6 have changed. Here I set a new label (“jdk17”) and used the new pod template (.ci/jdk17.yaml). Apart from that, no changes were made to the Jenkinsfile.
// Jenkinsfile
agent {
  kubernetes {
    label "jdk17"
    idleMinutes '15'
    yamlFile '.ci/jdk17.yaml'
    workspaceVolume emptyDirWorkspaceVolume(true)
  }
}
When executing the build now, it will succeed because the custom executor image has Java 17 installed.
[2022-03-21T15:01:01.779Z] + java -version
[2022-03-21T15:01:01.779Z] openjdk version "1.8.0_265"
[2022-03-21T15:01:01.779Z] OpenJDK Runtime Environment (AdoptOpenJDK)(build 1.8.0_265-b01)
[2022-03-21T15:01:01.779Z] OpenJDK 64-Bit Server VM (AdoptOpenJDK)(build 25.265-b01, mixed mode)
[2022-03-21T15:01:02.073Z] + /opt/devtools/jdk-17+35/bin/java -version
[2022-03-21T15:01:02.073Z] openjdk version "17" 2021-09-14
[2022-03-21T15:01:02.073Z] OpenJDK Runtime Environment Temurin-17+35 (build 17+35)
[2022-03-21T15:01:02.073Z] OpenJDK 64-Bit Server VM Temurin-17+35 (build 17+35, mixed mode, sharing)
Kickstarting CI Best Practices in Autonomous Teams was originally published in Dynatrace Engineering on Medium, where people are continuing the conversation by highlighting and responding to this story.